What's new

How to tackle this one?

OzBrand

Member
Hi All,

It's been a long while since I've been on here (few years maybe). Haven't done too many projects lately.

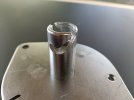
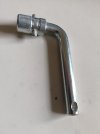
I'm a bit hung up on figuring the best way to handle this task. The pic attached is a shaft from a battery isolator which accepts a lever with two guide studs. I need to recreate the slot for the guide studs. The slot which is mirrored across the shaft's centreline axis is perpendicular to the outer cylindrical surface.

This particular example appears to be punched but I have another version which appears to be milled.

So my question is, how would one go about tackling this? I have placed a starting and finishing point on the attached AD-PRT file.

Cheers, Mike B.
 

Attachments

  • HDB Actuator Shaft V1.AD_PRT
    364.5 KB · Views: 10
  • Battery Switch Shaft 20220827.jpg
    Battery Switch Shaft 20220827.jpg
    3.7 MB · Views: 29

Ken226

Alibre Super User
Which version of Alibre are you using? If Expert, Sheetmetal would make this a fairly easy task.
 

HaroldL

Alibre Super User
That looks like a good candidate for the Wrap, if you have it. But I can only get it to 1mm deep. Maybe with some work on the sketch it may go all the way thru one side then a mirror to the other side would do it.

I stopped short at the top because it wanted to wrap around the top edge. Not what you want though.

1661564500626.png
 

Ken226

Alibre Super User
It's not a perfect representation, since I didn't copy your dimensions exactly. I just kinda sketched it real quick by eyeball. My software is set up In inches, so I converted everything and approximated.

But, as a proof of conept, I think sheetmetal will work for what you have in mind. If your using Expert.

If not, either wrap, as Harold suggested or perhaps a series of extrusions, from tangent planes.


Another possibility may be an extrude cut, then a small helical cut.

1661566623324.png
 

Attachments

  • New Sheet Metal Part (1).AD_SMP
    977.5 KB · Views: 8
Last edited:

OzBrand

Member
That looks like a good candidate for the Wrap, if you have it. But I can only get it to 1mm deep. Maybe with some work on the sketch it may go all the way thru one side then a mirror to the other side would do it.

I stopped short at the top because it wanted to wrap around the top edge. Not what you want though.

View attachment 37042
Hi Harold, I don't have the wrap feature it seems. I guess this is in a later build than mine. Cheers
 

OzBrand

Member
It's not a perfect representation, since I didn't copy your dimensions exactly. I just kinda sketched it real quick by eyeball. My software is set up In inches, so I converted everything and approximated.

But, as a proof of conept, I think sheetmetal will work for what you have in mind. If your using Expert.

If not, either wrap, as Harold suggested or perhaps a series of extrusions, from tangent planes.


Another possibility may be an extrude cut, then a small helical cut.

View attachment 37043
Thanks Ken, I can give it a crack in sheetmetal, I didn't think about that but I can see how you've done it. Cheers
 

Ken226

Alibre Super User
Hi Harold, I don't have the wrap feature it seems. I guess this is in a later build than mine. Cheers

Yup. V25 is the first version to have wrap and project. Very cool features.

I'm really digging the wrap and project features!
 
Last edited:

Ken226

Alibre Super User
Thanks Ken, I can give it a crack in sheetmetal, I didn't think about that but I can see how you've done it. Cheers

Here's an earlier thread about a similar operation, in case you find any of the info useful.

I had trouble getting it to work, and if I remember right, Harold solved that issue by suggesting some sheet metal parameter changes.


OzBrand

Member
Here's an earlier thread about a similar operation, in case you find any of the info useful.

I had trouble getting it to work, and if I remember right, Harold solved that issue by suggesting some sheet metal parameter changes.

That's a handy tutorial and nice presented too. Thanks for taking the time to assist. Cheers
 

OzBrand

Member
Ok, so I gave the sheetmetal option a crack (thanks Ken) and got a pretty good result except for one thing. The slot faces are not parallel and need to be, due to the parallel pin design of the actuating lever, (see pic). I then upgraded to V25 and tried the wrap feature. Nice feature, but as Harold pointed out I could only extrude this to 1mm and no other tool - move face, remove face, offset face, etc could change that. I finally went with the helix option and although it is not yet technically or dimensionally correct, it's showing some promise. Attached the file if anyone is interested.
 

Attachments

  • Switch Lever.jpg
    Switch Lever.jpg
    3.5 MB · Views: 11
  • HDB Actuator Shaft V2.AD_PRT
    472.5 KB · Views: 5

Ken226

Alibre Super User
Ok, so I gave the sheetmetal option a crack (thanks Ken) and got a pretty good result except for one thing. The slot faces are not parallel and need to be, due to the parallel pin design of the actuating lever, (see pic). I then upgraded to V25 and tried the wrap feature. Nice feature, but as Harold pointed out I could only extrude this to 1mm and no other tool - move face, remove face, offset face, etc could change that. I finally went with the helix option and although it is not yet technically or dimensionally correct, it's showing some promise. Attached the file if anyone is interested.

I'm stumped at getting better results than than the things attempted so far. Perhaps someone with more experience will chime in.
 

HaroldL

Alibre Super User
Remember in Sheet Metal all cuts are perpendicular to the surfaces, that may be the reason the cuts get smaller on the inside.

I went back to a Boolean Subtract. The challenge was to make a two-way helix. But it turned out okay but may need some tweaking to finalize the feature.

1662180905647.png
 

Attachments

  • HDB Actuator Shaft V1-1 Boolean.AD_PKG
    613.4 KB · Views: 5

OzBrand

Member
Remember in Sheet Metal all cuts are perpendicular to the surfaces, that may be the reason the cuts get smaller on the inside.
Yep, I figured that out - eventually! I'm going to try your boolean tomorrow Harold. It took me less than a day to design the first iteration of the whole switch, contact, springs, housing, studs, etc yet I've frigged around with the slots on this shaft for around 3 hours now.
 

HaroldL

Alibre Super User
Ok, so I gave the sheetmetal option a crack (thanks Ken) and got a pretty good result except for one thing. The slot faces are not parallel and need to be, due to the parallel pin design of the actuating lever, (see pic). I then upgraded to V25 and tried the wrap feature. Nice feature, but as Harold pointed out I could only extrude this to 1mm and no other tool - move face, remove face, offset face, etc could change that. I finally went with the helix option and although it is not yet technically or dimensionally correct, it's showing some promise. Attached the file if anyone is interested.
Why don't you submit the Wrap issue to Support to see if they can figure out why it only cuts 1 mm deep. It may turn out to be a limitation of the tool or maybe just a bug.
 

idslk

Alibre Super User
Hello @HaroldL ,

would you mind making the hole from your boolean part smaller, like 3mm (for a much thicker wall of the tube...) and post the result?

Regards
Stefan
 

idslk

Alibre Super User
Possibly another way would come nearer:

1662199232406.png

1662199314615.png 1662199397660.png

Regards
Stefan
 

Attachments

  • bayonet_loft.AD_PRT
    378.5 KB · Views: 0

Ken226

Alibre Super User
I tried a convoluted mix of planes, helical cuts and booleans. Way too much work though.:)

Test Thing Pic.jpg
 

Attachments

  • Test Thingy.AD_PKG
    515.1 KB · Views: 1

Ken226

Alibre Super User
Now that I've had my morning coffee, gonna give it another try.

My last try gave me the idea to try it with nothing more than a couple helical cuts, and some fillets. With the sketches for the helical cuts set on planes that are normal to the helix angle of the cuts. The helical cuts terminate at the bottom of OzBrand's pre-existing hole, blended with fillets.

It wasn't difficult at all, and only took a few minutes.

I tried to keep the distance between the cut faces at 4.35mm at all points along the cut, the same diameter as his starting holes. Not sure I succeeded though, but I bet it's close.

This time I did it using OzBrands own part, so it's in mm rather than inches. :)


1662230936954.png

View attachment 37119

1662231003746.png
 

Attachments

  • HDB Actuator Shaft V1.AD_PRT
    755 KB · Views: 2
Last edited:
Top