What's new

Keyshot - Rendering settings

Lukin

Member
Dear all,

while viewing your pictures in the gallery, I was surprised how nice pictures you can render.

Can anyone provide some basic settings for the render and the minimum number of frames needed to make the result as beautiful as in the gallery?

My edges are usually not that sharp and the texture on the parts is mostly blurry or bland (e.g. brushed stainless steel).

I assume you are using the version of Keyshot that is available on the Alibre website?

Thanks everyone for any advice. And I wish you much success in your work.
 

HaroldL

Alibre Super User
Go over to the KeyShot web site, they have some good training videos there. Be aware that they are for the Professional version but still work for the CAD version although it is somewhat limited to resolution.

 
Last edited:

simonb65

Alibre Super User
Here are the setting I use, they give pretty good quick results, edges are great, but the surfaces still look a bit speckled!

1659127237027.png
 

Lukin

Member
Dear HaroldL and Simonb65,

thank you for your answers and for the time you took to respond to the question.

Simonb65, thank you for your specificity. Now the rendered images really look a bit better.
 

Max

Administrator
Staff member
When I render most things a sample of 200-300 is what I use. Also consider switching the default lighting to Product prior to rendering. Jagged edges and things looking unrefined are typically a sample count issue.
 

Lukin

Member
How surprised and pleased I am by the response to my question directly from the CEO.

It is true that I am trying different types of lighting. And the lighting called Product gives nice results.

Only in some situations I don't see much difference between using for example 50 samples and 200 samples (not taking into account the render time :D, there is of course a really big difference).

Thank you for the answer.
 

HaroldL

Alibre Super User
Are you looking at the results in the real time render window or in the final render? Remember too that, generally, the longer you let it render the better it will look.
You might also try using different environments. They can sometimes have a effect on the final image.

Can you upload a sample part that you are trying to render or at the least post a screen shot of your KeyShot with the part loaded?
 

Max

Administrator
Staff member
Post an example of what your are seeing. There are different types of jaggies and each cash require different aporoaches to fix.
 

Lukin

Member
Hello,

I'm attaching a .bip file and two rendered images.

For both of them I used the default KeyShot settings just assigned the materials and changed the lighting to Product.

For the first one (001-001.1) 20 samples were selected (rendering time about 2 minutes). For the next one (001-001.2) 200 samples were selected (rendering time approx. 20 minutes).

I don't think I see much difference between these images, except for the rendering time. And still the file size is different. But I would expect an image with 200 samples to be larger in size. But it is exactly the opposite.

Thank you all for the responses so far.

Edit: I can't insert a .bip file.
 

Attachments

  • 001-001.1.png
    001-001.1.png
    1.5 MB · Views: 31
  • 001-001.2.png
    001-001.2.png
    1.3 MB · Views: 31

Lukin

Member
I've uploaded the model pack, if you want you can try to set up your render to compare the results.

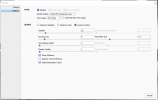
I'm attaching images with the render settings.

1660838447212.png

1660838504227.png
 

Attachments

  • 001-001.AD_PKG
    295.7 KB · Views: 3

Max

Administrator
Staff member
Where in the image is the issue? I don't see any super obvious aliasing (jaggies).

Samples does not affect image size or dimensions. It just makes the same image look better by doing more analysis. The more samples, the more physically accurate the lighting becomes. Different things require different sample counts. For example, if you had a glass of water and a light shining through it, it would cast warped light onto the table. This kind of image requires a lot of samples to make the casted light look accurate (non-pixelated). Generally speaking, if you have things that are transparent (glass or transparent plastic) or translucent (candle wax/marble/human skin/etc) they will require significantly more samples to get to look right than something like an assembly made mostly of paint and metal.
 

Max

Administrator
Staff member
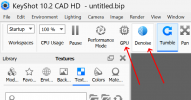
Also on the chance you might have an nvidia graphics card, be sure to enable GPU mode if you can. This makes rendering orders of magnitude faster, depending on your card.

Also definitely play with Denoise, it can allow you to render at much lower samples (faster) and it automagically cleans it up for you. It's not perfect, but it's quite good.

1660838687493.png
 

Lukin

Member
As I wrote above due to the advice of people here on the forum and a short study on the internet the pictures already look pretty good. I was just surprised that there is no visible difference between the images when I use higher number of samples.

Now after your reply I understand that I would have to use different materials (transparent) to make it clearly obvious.

I have an NVIDIA graphics card, but I can't turn this option on. I am using an older workstation that uses an NVIDIA Quadro K1100M card. Maybe that's the problem why this feature can't be turned on now. The station has 16 GB RAM and an Intel Core I7 processor. And Alibre works quite well on it so far. Except for some small exceptions (when working for a long time without closing the application). That's why I haven't upgraded to a better workstation yet. However, I've been thinking about it lately. And maybe I will upgrade next year (I assume there will be another version of Alibre). Because now it seems to me that you are developing pretty fast.

But please don't take this as a request (for the next version :D), rather as a thank you for the work of you and the whole development team.

Sorry for my English, I use a translator.

Thank you for everyone's time and great support.
 

Max

Administrator
Staff member
If you consider a new workstation, I can give you an example of my workflows, times:

I often render 500 part assemblies with very complex lighting at full 4K (3840x2160). Rending using my cpu will take 25-50 minutes to get 500 samples. With my nVidia GPU (a 3000 series, they are becoming much more affordable especially in the last month) the render takes usually 20-30 seconds. :D

So if you render a lot, it's definitely a consideration.
 

Lukin

Member
I've only been using rendering more for a while. But many people appreciate it because it gives them a more realistic view of the product.

I'm sure these practices would be appreciated (not just by me), and certainly the recommendation of some basic workstation parameters (although I understand that this can be quite subjective for some users). But the main thing is reliable and good functionality. And for you it seems to work very well and give good results.
 

HaroldL

Alibre Super User
Another thing you may want to take a look at is the material you are using for the sheet metal panels. Using stock Steel material will give a reflection of the grill parts that will make it appear blurred.

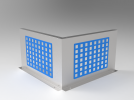
Here's a close up screen shot that shows that result:

1660846385908.png


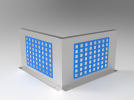
Here's a screen shot with a Paint material applied to the panel:

1660846926047.png


And this is a Snapshot out of KeyShot with the Paint material. I also added a .13 mm radius to the parts to give some definition between the two panels where they come together in the corner.

Lukin Panels.png
 

NateLiquidGravity

Alibre Super User
I was just surprised that there is no visible difference between the images when I use higher number of samples.
Here is my understanding of samples: Samples are used for determining the "accuracy" of the color. However there is a law of diminishing returns in effect for samples. Once your sample count reaches a certain level it becomes less likely you will see a change by increasing it higher. That level increases as scene complexity increases.
 

Max

Administrator
Staff member
Here is my understanding of samples: Samples are used for determining the "accuracy" of the color. However there is a law of diminishing returns in effect for samples. Once your sample count reaches a certain level it becomes less likely you will see a change by increasing it higher. That level increases as scene complexity increases.
That is roughly true, though I think the term "color" here, while accurate, is perhaps misleading. Think of it like this - when an artist paints something, they often start with the big features first. The result looks kind of like what you're after, you can tell what it is. Then they keep adjusting, adding more detail, especially more small detail. Over time, the painting resolves to being "correct".

If you like the science, what's basically happening here is that a bunch of random rays are being cast throughout the scene from the camera, and along their journey they hit various things and get absorbed (matte materials) or reflected (depending on the roughness value) or transmitted (glass/wax/subsurface materials) etc. Once all the rays have been calculated, you get an idea of what the final image will be like. But you really need a loooot of random rays flying around to get a final image. Active areas of research in general focus on ways to make rays that are smarter than random.

Since we need so many rays to hit everything, statistically, we do not want to ask the computer to send out 1000000000 rays at once - you would be sitting there forever, and for many scenes you don't need that many. So instead, it sends out say 10000 at a time and waits to see how good the result is, as defined by your human eyes. That's one Sample. Then it sends another 10000 (made up) rays randomly and waits to see what those hit. 2nd Sample. For some simple scenes, maybe 1,000,000 random rays is enough to make you say "that looks good enough". For other scenes, it may take 45,000,000. These are made up numbers but just illustrates what a sample is.

So long story short, the more samples you have, the more chance you have given these random rays to propagate the scene and hit whatever they will hit and eventually land on part of the model that represents a pixel. You're correct in that, at a certain point, there is no human-perceptible difference. For example, an image made from a sample count of 1000 will, under most circumstances encountered by scenes generated from Alibre, be no different than a sample count of 9,000,000, for a given image output size.

So the trick is to find the lowest samples that are "good enough" to give you want. Generally speaking, this number is under 1000 samples almost always, and is usually in the 100-400 range for most things, but really is model and material dependent, and depends on how eagle eyed you are. If your model is a novel series of lenses that shoots light through water to focus on a square of wax, you may be sitting at your computer for a long while to get a perfect result - it's going to take a long time for enough of the random rays to pass through that lens system and hit the target wax. Most random rays wont even hit the first lens, for example. If your model is metal and paint, it's a lot faster to get accurate results with lower samples.
 
Last edited:
Top