What's new

TUTORIAL: Speaker Grilles

ajayre

Alibre Super User
OK, so you may not be that interested in speaker grilles, but I hope to show you in this tutorial some new techniques that might give you inspiration for solving problems you do have.

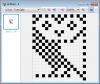
Create an image in your favorite editor. I use an old version of IcoFX from when it was still free. The image needs to be small, e.g. 16 x 16 pixels. Fill in pixels in solid black. This is your grille design. Wherever you put a black pixel there will be a hole.

I used something from my childhood - the iconic BBC Micro owl.


The image is 17 x 21 pixels. I've left unused pixels transparent. Save this as BMP or PNG.

Start WizoScript and copy and paste the script from http://www.wizotools.com/2016/06/01/speaker-grille-from-bitmap-image/ into it.

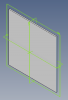
Create a new part, or open an existing part. In order to create the grille we need two things: a face to cut into and a point that marks the center of the grille. The point doesn't have to be on the face - if it isn't it will be projected onto the face. In my example I simply used the Origin.


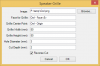
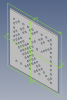
Run the script and a dialog window will be shown. Enter the parameters, choose your image file and select the face and the point.
 

Attachments

  • Owl-IcoFX.png
    Owl-IcoFX.png
    34.8 KB · Views: 50
  • Owl-Blank.png
    Owl-Blank.png
    9.8 KB · Views: 295
  • Owl-Dialog.png
    Owl-Dialog.png
    7.5 KB · Views: 297

ajayre

Alibre Super User
Click on OK. You should now see the grille created and it should match your image.


Possible improvements: using different colors of pixels for different hole sizes, using a pixel color to represent blind holes, using different shaped holes - perhaps taken from another sketch.

Under the hood:

The dialog window is easily constructed:

Code:
Options = []
Options.append(["Image", WindowsInputTypes.File, None])
Options.append(["Face for Grille", WindowsInputTypes.Face, None])
Options.append(["Grille Center Point", WindowsInputTypes.Point, None])
Options.append(["Grille Width (mm)", WindowsInputTypes.Real, 100])
Options.append(["Grille Height (mm)", WindowsInputTypes.Real, 100])
Options.append(["Hole Diameter (mm)", WindowsInputTypes.Real, 4])
Options.append(["Cut Depth (mm)", WindowsInputTypes.Real, 5])
Options.append(["Reverse Cut", WindowsInputTypes.Boolean, False])

Values = Win.OptionsDialog(ScriptName, Options)

We simply create a list of the inputs our script requires. Each entry has a name, the type of data and an optional default value.

If the user selects a face, point or anything else we can get the part by doing this:

Code:
# get the part we are editing
Prt = GrilleFace.GetPart()

This allows us to create a script without knowing in advance anything about the part we will be working with.
 

Attachments

  • Owl-Completed.png
    Owl-Completed.png
    19.5 KB · Views: 292

NateLiquidGravity

Alibre Super User
@ajayre The link is broke, so I hope it's ok I put the script here I had downloaded earlier.

Code:
# get access to library in Windows for using images
import clr
clr.AddReference('System.Drawing')
from System.Drawing import Image
 
ScriptName = 'Speaker Grille'

# create a dialog window to allow user to select image and where grille will go
Win = Windows()
Options = []
Options.append(['Image', WindowsInputTypes.File, None])
Options.append(['Face for Grille', WindowsInputTypes.Face, None])
Options.append(['Grille Center Point', WindowsInputTypes.Point, None])
Options.append(['Grille Width (mm)', WindowsInputTypes.Real, 100])
Options.append(['Grille Height (mm)', WindowsInputTypes.Real, 100])
Options.append(['Hole Diameter (mm)', WindowsInputTypes.Real, 4])
Options.append(['Cut Depth (mm)', WindowsInputTypes.Real, 5])
Options.append(['Reverse Cut', WindowsInputTypes.Boolean, False])

# check for cancel
Values = Win.OptionsDialog(ScriptName, Options)
if Values == None:
  sys.exit()
 
# get path and name of image file
ImageFile = Values[0]
if ImageFile == None or not ImageFile:
  Win.ErrorDialog('No image selected', ScriptName)
  sys.exit()
 
# get face in part
GrilleFace = Values[1]
if GrilleFace == None:
  Win.ErrorDialog('No face selected', ScriptName)
  sys.exit()
 
# get center point
CenterPoint = Values[2]
if CenterPoint == None:
  Win.ErrorDialog('No center point selected', ScriptName)
  sys.exit()
 
# get dimensions
Width = Values[3]
if Width == 0:
  Win.ErrorDialog('Invalid width', ScriptName)
  sys.exit()
Height = Values[4]
if Height == 0:
  Win.ErrorDialog('Invalid height', ScriptName)
  sys.exit()
 
# get hole diameter
HoleDiameter = Values[5]
if HoleDiameter == 0:
  Win.ErrorDialog('Invalid hole diameter', ScriptName)
  sys.exit()
 
# get cut depth
CutDepth = Values[6]
if CutDepth == 0:
  Win.ErrorDialog('Invalid cut depth', ScriptName)
  sys.exit()
 
# get reverse cut
ReverseCut = Values[7]
 
# get locations of all the black pixels in the image
# the origin of the image is top left but the origin of the sketch
# will be bottom left so we need to flip the points
Points = []
Img = Image.FromFile(ImageFile)
for x in range(Img.Width):
  for y in range(Img.Height):
    Pixel = Img.GetPixel(x, y)
    # A = alpha channel aka transparency, 255 = opaque
    if Pixel.A == 255 and Pixel.R == 0 and Pixel.G == 0 and Pixel.B == 0:
      y = Img.Height - y - 1
      Points.append([x, y])
 
# scale points
ScaleX = Width / Img.Width
ScaleY = Height / Img.Height
for P in Points:
  P[0] = P[0] * ScaleX
  P[1] = P[1] * ScaleY
 
# get scaled size
ScaledWidth = Img.Width * ScaleX
ScaledHeight = Img.Height * ScaleY
 
# get the part we are editing
Prt = GrilleFace.GetPart()
 
# create sketch and project center point onto sketch
Sk = Prt.AddSketch('Grille', GrilleFace)
Center = CenterPoint.GetCoordinates()
[cx, cy] = Sk.GlobaltoPoint(Center[0], Center[1], Center[2])
 
# center points
for P in Points:
  P[0] = P[0] - (ScaledWidth / 2) + cx
  P[1] = P[1] - (ScaledHeight / 2) + cy
 
# draw holes
for P in Points:
  Sk.AddCircle(P[0], P[1], HoleDiameter, False)
 
# cut holes
Prt.AddExtrudeCut('Grille', Sk, CutDepth, ReverseCut)
 
Last edited:

NateLiquidGravity

Alibre Super User
I noticed the following and realized it wasn't documented but works like a charm to speed things up. Please add this to the Quick Start / Reference documentation.

Code:
Sk.AutomaticStartEndEditing = False
Sk.StartEditing()
for P in Points:
  Sk.AddCircle(P[0], P[1], HoleDiameter, False)
Sk.StopEditing()
Sk.AutomaticStartEndEditing = True
 

ajayre

Alibre Super User
It's undocumented because it's internal. Doing that may cause things to break, either in past releases or a future release. Andy
 

NateLiquidGravity

Alibre Super User
Ok, knowing this I will keep an eye out for trouble when using it.
I will also remove it from the full script above.

I didn't say it earlier but this is a really fun script. I'm thinking about modifying it to use grayscale images where the amount of gray determines the size of the circle.
 
Top