What's new

Disable Auto Orientation on Action?

Is there a way to disable the auto orientation when taking an action? For example, orienting to a sketch when editing is useful, but in many cases I try to setup a specific view to see what I'm doing, for example when extruding or cutting a feature. If I try to create or go back to edit such a feature the view quickly spins around to show the object from another angle. Sometimes this gets in the way. Maybe a way to disable it selectively by holding down a modifier key of some kind?

If currently not possible then this is a feature request to enable this behavior by holding a modifier key while working.
 

Ken226

Alibre Super User
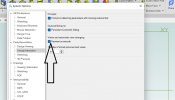
Also, you can disable "Snap to working plane". This will prevent the sketch plane from snapping to normal view when you activate it. I find this one more useful to leave activated.

Untitled.jpg"
 
Also, you can disable "Snap to working plane". This will prevent the sketch plane from snapping to normal view when you activate it. I find this one more useful to leave activated.

View attachment 37066"
Right now I am working on a set of modular part / art-supplies organizers that can be 3D printed in Vase Mode. Let me know if your interested, I'd be happy to share a copy once they are finished :)


Screenshot 2022-08-29 221608.jpg

Thanks again
 

Ken226

Alibre Super User
Right now I am working on a set of modular part / art-supplies organizers that can be 3D printed in Vase Mode. Let me know if your interested, I'd be happy to share a copy once they are finished :)


View attachment 37067

Thanks again

Feel free to upload a copy.

I don't do much artwork. Most of my free time is spent out on my manual and CNC machinery, but I love disecting the CAD work of others. I lean alot from doing that.

Seeing the ideas other people use to solve problems, gives me additional problem solving tools.
 

HaroldL

Alibre Super User
Seeing the ideas other people use to solve problems, gives me additional problem solving tools.
That's a good plan. I remember at work having discussions with other CAD designers about how to create some of the odd features needed for some of the custom enclosures we were building. The result was not only an easier way to model the feature but a way to produce it in the shop with existing tooling. Sometimes though it did require a new tool for the turret fabricator.
 
Feel free to upload a copy.

I don't do much artwork. Most of my free time is spent out on my manual and CNC machinery, but I love disecting the CAD work of others. I lean alot from doing that.

Seeing the ideas other people use to solve problems, gives me additional problem solving tools.
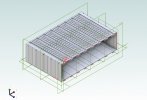
It's still a WIP and I'm test-printing everything right now for fit. It's essentially a box with crenellated, corrugated, and pocketed sides to increase stiffness. The pieces lock together with rails resembling puzzle pieces. There's a shelled version for more rigidity, and a version that can be printed in vase mode for the adventurous. My main issue with it is my printer can only go up to a 0.9mm extrusion width, so the vase mode wall isn't as thick as I'd like.


I also experimented with a little hack to 'trick' the slicer into using vase mode to produce a double wall (by adding a tiny cut to the perimeter at key places). It works pretty well, but print times weren't much better than a standard 2-wall print, so I gave up on that idea for the organizers.


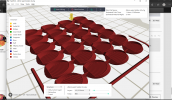
I also spent some time looking at other vase mode objects and organizers that others have posted online. I made my own version of the vase-mode model paint organizers. It alternates between printing cylinders in vase mode with a two-extrusion thick wall to connect them. Each column of cylinders is then connected by a row of the same double thickness wall which moves upward along a 45° angle. The wall doesn't perfectly meet the corner, so the slicer needs to be able to switch from vase mode to island mode for the last couple of cm. I wasn't sure how to set up the parametric build to perfectly hit the corner.

STL - https://drive.google.com/file/d/1PKwgNBQcm8NSiiQHfXMfv_Ofi6lVBPV4/view?usp=sharing
AD_PRT - https://drive.google.com/file/d/1PMNSEen2R23DzpnFjo1QUWPwEZ7XM53_/view?usp=sharing


P.S. And I just found the attach file button, derp
 

Attachments

  • 28mm paint holder.AD_PRT
    1,009.5 KB · Views: 6
  • Modular Organizers WIP.zip
    198.7 KB · Views: 5
  • Small Parts Holder.zip
    69.1 KB · Views: 7

Ken226

Alibre Super User
Pretty interesting designs.

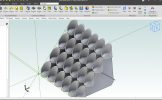
That paint holder would make an excellent airbrush cup rack, with the pods hollowed.


1661886244260.png
 
Pretty interesting designs.

That paint holder would make an excellent airbrush cup rack, with the pods hollowed.


View attachment 37071
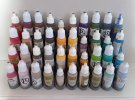
no need to shell them, set the top faces flat against the print bed and enable vase mode with 0mm bottom thickness. The slicer hollows them for you and prints in a single pass per layer. 0.6mm extrusion width recommended. Saves on material and prints in half the time ;p20220825_155356.jpg
 

Ken226

Alibre Super User
no need to shell them, set the top faces flat against the print bed and enable vase mode with 0mm bottom thickness. The slicer hollows them for you and prints in a single pass per layer. 0.6mm extrusion width recommended. Saves on material and prints in half the time ;p

Nice!

Ill admit it, sheepishly. Though i've seen "vase mode" many times in my Flashprint slicer program, ive never actually used it. I'll have to test that out.

So, thats intended to be printed, basically upside down from the orientation in my pic above?


I'll have to play with the settings in my slicer. In vase mode. Flashprint leaves them capped.

1661887415670.png
 
Last edited:
Top