What's new

How long does it take to render an image decently?

JST

Alibre Super User
Obviously it DOES depend on the hardware, but in general should one expect several hours to not be enough?

I have been very unhappy with the Keyshot rendering quality on certain stock materials, and others that I tried to modify to improve them, as well. Some things quickly arrive at a good result, others show zero improvement after hours of undisturbed processing.

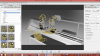
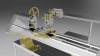
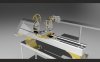
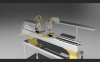
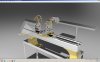
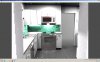
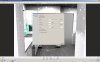
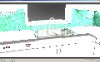
The attached (modified from prior images since the "client" made changes), has particularly crude rendering of the stock "light brushed stainless" in the sink, and not a lot better for the hood or the microwave. The stove and dishwasher are better, but show white spots in areas instead of what presumably should be light reflection highlights. And the gloss white cabinets show "freckles" of reflected light on them that consist of a bunch of white spots.

The sink is a particularly bad spot. It looks nothing like brushed stainless, it looks more like the fractured surface of cracked steel, or as if it had been sandblasted. NO SIGN of the linear scratch pattern of brushing.

I expected that 2 or 3 hours would make things better, but it has not really changed anything from what it looked like after 2 or 3 minutes.

What does it take to get a decent presentable image?


I did ask over at the Keyshot forum, but I don't expect much. It is dead as a doornail. There are postings that have gone ignored for months over there, and some of the more recent postings are from 2013 in certain areas.
 

Attachments

  • view from back door with stainless appliances.jpg
    view from back door with stainless appliances.jpg
    607.1 KB · Views: 28

TylerDurden

Alibre Super User
That looks rough. :?

Attached is a zipped bip of your mill project. All parts polished chrome or brass (lotta reflections).

It takes 8.2 sec to render on my rig. Compare quality and time on your rig. Rendering settings shown in screenshot (1920x1080 full render).
 

Attachments

  • readymill on logan lathe base assy.zip
    671.5 KB · Views: 2
  • screenshot.png
    screenshot.png
    671.6 KB · Views: 10
  • readymill on logan lathe base assy.22.png
    readymill on logan lathe base assy.22.png
    484.5 KB · Views: 30

JST

Alibre Super User
Well, here are the versions. Done with setting directly from the BIP, no changes

10 seconds


30 seconds


1 min
 

Attachments

  • 10 seconds.jpg
    10 seconds.jpg
    245.2 KB · Views: 13
  • 30 seconds.jpg
    30 seconds.jpg
    233.6 KB · Views: 10
  • 1 min.jpg
    1 min.jpg
    230.4 KB · Views: 13

JST

Alibre Super User
and next

2 min


3 min


5 min
 

Attachments

  • 2 min.jpg
    2 min.jpg
    215.9 KB · Views: 9
  • 3 min.jpg
    3 min.jpg
    244 KB · Views: 4
  • 5 min.jpg
    5 min.jpg
    226.2 KB · Views: 7

JST

Alibre Super User
Lastly 10 minutes


(I do not know what the item labeled "attachments" is in the last post..... I cannot get rid of it)

It's a tough thing to judge.

In a lot of ways, the image is probably as good as yours between 30 sec and 1 min. The reflections at the capacitor on top of the motor, for instance. In other ways, the image is nowhere near as good even after 2 minutes, such as the vertical column reflections off the pulley, where the 2 minute version still has a lot of white dotting, and yours has a clean gradation.

The 5 and 10 minute versions still don't seem to show the same level of "goodness". I suspect a 30 minute would not either. Just taking 10 minutes, that suggests a speed difference of almost 75:1, which I have some trouble believing in.

So it looks like the speed difference is somewhere between 4x and 400x....depending on what detail you concentrate on, and whether you believe it. How do we call THAT one?

I tend to doubt the 400x, and I doubt the 4x also.


I'll add a much longer term one and see.
 

Attachments

  • 10 min.jpg
    10 min.jpg
    225.5 KB · Views: 13

jhiker

Alibre Super User
Regarding the kitchen, it looks like the lighting environment is way too bright for the interior scene. The way that materials render is very dependent on the lighting, I find.
With the sink you could either alter the scale of the texture/bump map or choose an alternative 'brushed/scratched' texture and see whether that helps but I would try and get the lighting right first.
Regarding the mill, everything looks too 'shiny'. I would recommend increasing the material roughness a bit and adding some light texture maps. Incidentally, it's worth modelling some small chamfers and rads to catch the light rather than having sharp edges on all the components. You can add a radius to the parts in Keyshot using the 'rounded edges' feature.
Here's how it looks after a few minutes with the materials tweaked a bit.
 

Attachments

  • 2015-09-14_10h36_37.jpg
    2015-09-14_10h36_37.jpg
    148.6 KB · Views: 20
  • 2015-09-14_10h45_29.jpg
    2015-09-14_10h45_29.jpg
    71.4 KB · Views: 16

TylerDurden

Alibre Super User
Good tips, Jeff!

JST, Are you just taking screenshots of the workarea? I don't think that will produce the same as using the render button.

In the kitchen scene, are you using some abient -occlusion or other environmental modification?
 

JST

Alibre Super User
JH: The mill is just whatever TD posted. I used it so both of us would be rendering the same image.

As for the sink, tec, I have about 2 hours in on messing with settings to get anything reasonable.....


TD:
Screenshots of presentation mode. I have it set so it auto-renders, and I need to find how to turn that off, as it is annoying. It started doing that suddenly, I don't know how.

Is not rendering rendering? The button seemed to do nothing different, and what I looked up in manual had no special info about it.
 

TylerDurden

Alibre Super User
When I click the render button (or use the menu/ Ctrl-P), KS opens a dialog box with numerous settings/menus.
 

Attachments

  • RenderDia1.png
    RenderDia1.png
    209.3 KB · Views: 15

TylerDurden

Alibre Super User
The settings for realtime render have user defined time-limits, so if you're setup for outputting the realtime settings, the render might quit after a short period.

If you want to share the scene you are using, we can get a better comparison.
 

JST

Alibre Super User
I Should say, "I didn't see that". With the new version, I hadn't tried it, and now that I have, I DO see that.

But it won't close....... Can't get a shot of the rendering without the selections window in front of it, and can't do presentation mode, the unclosable window is always busy, even when 100% rendered. I used the "screenshot" button instead as a workaround, but could never get to presentation mode.

Took 4 min 23 sec to get this, but I did set the settings for a very good result, I didn't stick with whatever came in.
 

Attachments

  • rendered with button.jpg
    rendered with button.jpg
    246.4 KB · Views: 11

JST

Alibre Super User
Moving to the kitchen, I started it off with the same settings, but bailed on them when it became obvious that it was on-track for a 25 hour rendering time.

Reset for a lot fewer bounces, no focused caustics, and so forth, and it is much faster. We'll see how that goes.

There seems to be a difference in rendering. The button renders by small pixel areas, apparently finishing with each one and moving to the next, pixel by pixel. By contrast, the auto render seems to make progressive passes over the entire picture, something like the way a .GIF image is handled. With each pass the image improves.

I don't know which is the preferred method. It seems that the pixel by pixel would be the "real" method, now that it is evidently working in the new version.

But, from the videos, comments were made as far as how long to let it go, with the diamond ring being left to go overnight (that was in the focused caustics video I believe). That implies that the rendering was done by the progressive pass method. It could not refer to the pixel by pixel method, because if you terminate that method early your image will have coarse pixels in some places, so it isn't a good image.
 

JST

Alibre Super User
So, I let it go 3 hours. You can see the progress so far. I'd call it considerably WORSE than the prior renderings.

Still looks particularly bad in the stove hood, microwave, sink and faucets, there are areas of white spots, there are still "freckles" on some of the cabinetry near the stove plus scattered elsewhere, and the tile reflections are splotchy and completely un-natural appearing....as if off rippled water. There is no swimming pool in the kitchen!

Then also, the splotches in front of the stove are un-natural as well. No idea what they are, except perhaps reflections of the can lights. Problem is, I never see that in a real kitchen. It's not realistic looking.

The lighting was mentioned, with the suggestion that it is too bright. There are several 60W can lights in the ceiling, and there are some 25W lights under cabinets and stove hood. In a real kitchen, that would be "ok" lighting, nothing too special, not too bright. For sure, the 25W lamps should not be saturating out the image, they just are not that bright in reality.


Here are the settings used in the render window. Must be something chosen badly, because I judge it WORSE than what I had before. And it does not seem to work this way with the "presentation mode" full-screen with no toolbars etc.


Does it go through everything again after it is done? I do not think so. On the other rendering, of the mill thing, it terminated when it had been around over all the pixels once, so I assume when it finishes it is done. The "percent done" counter confirms that. So evidently this is as good as it is going to get with the (possibly bad) settings I used.

Some of the splotches etc could be tolerated if I could find a way to get the sink, faucets, hood and microwave to be right. They should be exact same material as the stove and dishwasher, but look entirely different.
 

Attachments

  • Partial render 3 hours.jpg
    Partial render 3 hours.jpg
    352.9 KB · Views: 17
  • partial render settings.jpg
    partial render settings.jpg
    602.5 KB · Views: 10

JST

Alibre Super User
So I tried a close-up, thinking it might look better when it was larger in the image.

Not really, it's obviously not going to get better. I only let it get through some of the middle, that took long enough, and was not improving.


After that, I reduced the lights to 40W and 15W under the cabinets. Not much if any difference. I really didn't see anything different in the "button render", so I terminated it.
 

Attachments

  • closeup render.jpg
    closeup render.jpg
    216.1 KB · Views: 9

JST

Alibre Super User
NVidia "card" quadro Fx1600 (it is a laptop, so "card" is built in)

Resolution 1920 x 1300 or so, it's actually slightly more than that.

It happily displays and shows most materials much better, just a few, like the stainless I don't know how to improve. The "mill" shows up with very good rendering, the sink, not so good.
 

jhiker

Alibre Super User
Re: Kitchen
I think the splotches could be caustics - do you have them switched on?
What does your 'settings' page look like?

Are you rendering with 'maximum time' set?
If you double-click on the lights in the scene tree you can dial the intensity down a bit - disregard the 'wattage' settings for now.
Which lighting environment are you using?
Have you tried adjusting the scale and bump height of the textures on the sink/faucet/microwave?

Can you share the scene?
 

Attachments

  • 2015-09-15_09h00_11.jpg
    2015-09-15_09h00_11.jpg
    44.6 KB · Views: 13

Kyle

Senior Member
JST said:
NVidia "card" quadro Fx1600 (it is a laptop, so "card" is built in)

Resolution 1920 x 1300 or so, it's actually slightly more than that.

Please keep in mind that KeyShot is a CPU based rendering application. So, performance and rendering times will be more dependent on your CPU and RAM.


https://www.keyshot.com/faqs/
 

JST

Alibre Super User
splotches likely are caustics, I had that on because it improves other things, but I have not figured out WHY there are those reflections..

As far as I know, wattage is the way to dial the lights down. I did try lower, it reduces the area that is saturated-out, but not the effect. Nothing good happens with the stainless material.

I have been all over with the bump etc. It mostly affects the "sandiness" of the appearance, from fine sand to gravel type surface. I have not found the "streakiness" control. The "heavy brushed" actually looks no better to me.

Scene is fine to share, but I think is much too big. Maybe I have still got a zipping routine that can get it small enough.

Lighting environment I think is irrelevant, since it is dark in there until my lights are on. I left the outside lighting alone.

Maximum time I did not set. Took long enough already, and other things improve while the sink etc don't, so it does not appear that they will improve with more passes/time.

settings I will show when I get where the machine is.
 
Top