IQ Workshop
New Member
Following on from the introduction to the creator spotlight, I was asked by Savage about one of my projects the “El’Stevo Cheapdeck”. As you can probably tell by the name, this is a tongue-in-cheek poke at the Elgato Streamdeck. I’ll apologies for the long post now
The streamdeck is a macro button box and comes in various sizes and price brackets. All of which are above my content creation monterey budget (near zero). The streamdeck is connected to a computer and can be used to trigger various actions, from opening a program or changing scenes in a live streaming application (in my case Open Broadcast Software or OBS)
V1 of the cheapdeck was constructed from an Arduino pro microcontroller, a series of buttons and some WS2812B LEDs. costing me between $5-$10 in parts, and so the cheapdeck name was born. This box allowed me to control my stream, with functions like start/stop broadcasting, start/stop recording, changing scenes and muting mics etc. The LEDs would keep track of what the scene was selected, mic muted etc. This was essentially a glorified keyboard. With each button press having a combination of function buttons and regular keys mapped into OBS as a shortcut. To make sure that I didn’t accidentally trigger an action and take my live stream offline, I mapped the function keys to F13-24, which are not present on any of my keyboards.
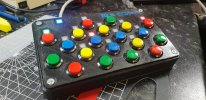
This was great! I had control of my stream in an easy macro button box, but there was a major drawback. I would have to sync the button box with OBS manually at the beginning of the stream. The LEDs triggered internally to the cheapdeck on the button presses, and there were some cases where I needed to change something in OBS for which cheapdeck had no clue about. There was no feedback from OBS to cheapdeck to say something had happened. This would cause cheapdeck to go out of sync and I would have to be creative to get it back, while trying to work on the topic of that live stream.
This is where V2 came in. I decided to change the way I interfaced with OBS in order to have the feedback loop so no matter where the action originated from, Cheapdeack would stay in sync. I decided to use an ESP32 microcontroller for this version as it had quite a few upgrades over the pro micro. Firstly it has wifi, meaning I could untether it from the PC and wear it on my forearm. Secondly, and I didn’t know at the time how critical it would be, it has 2 main processors. With this feature set, I was able to connect and eINK display to save on power consumption, and an off-the-shelf keypad. The first challenge was to get the eINK display to write some sort of data to tell me it was working. From there I iterated writing my own text and variables, connecting to the network etc, until i built up a user interface that worked with OBS.
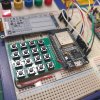
I did have an issue with the eINK display, in that there was a small delay in writing updates to the screen. This was not a major issue, but it did make the user experience sluggish, as it would often miss button presses which made me feel i was fighting it. This was overcome by offloading screen updates to the 2nd core of the ESP32. Not that I knew it at the time, but I had just written a multi-threaded application using Real-Time OS (RTOS).
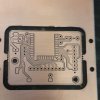
At this point, it was time to get it off the prototyping board and onto it’s own PCB. Using KiCAD, FLATCAM and CNCjs, I was able to mill my own PCBs that looked great. Well… they did until I tried to apply a solder mask. This was a 2 sided milling operation and I had some challenges with vias (connections from one side of the board to another), meaning I had to run some enameled wire to the pins of the ESP to make things work.
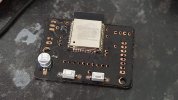
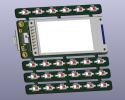
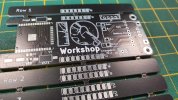
Now I knew i had a solid platform, I resigned the PCB in KiCAD to have a PCB per row of the keypad. This would allow me to apply a curve to the assembly and allow it to wrap around my forearm. I used a PCB manufacturing service to make a board that looks professional and a whole lot better than my homemade attempts. In addition to this I changed the battery I was using from an 18650 to a puch style lithium cell. This helped compress the overall package height. With this cell I got over 28 hours of continuous use. Plenty to cover a live stream.
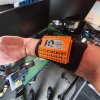
I knocked up a case in CAD and 3d printed it and attached it to an elasticated bracer for last year's Makers Central
I have successfully used cheapdeck to control my livestream at home, beaming in HVEC video and control telemetry from a remote location over the last 2 years.
This is quite the setup, and not the most user-friendly experience.
So this is where we are today. V3 is in development and if things go to plan, I will be launching a kickstarter this year. V3 will have a complete software rewrite so that it's more user-friendly and have more uses than for live streaming. It will be rebranded to a more appropriate name for marketing purposes and will be a product that can be bought.
That’s a lot to type, and a lot for you to read and digest.
If you made it this far, thank you.
I have summarised a lot here as I’m condensing the process of 4 or 5 years of work into a single post. So if you want more details, feel free to ask
The streamdeck is a macro button box and comes in various sizes and price brackets. All of which are above my content creation monterey budget (near zero). The streamdeck is connected to a computer and can be used to trigger various actions, from opening a program or changing scenes in a live streaming application (in my case Open Broadcast Software or OBS)
V1 of the cheapdeck was constructed from an Arduino pro microcontroller, a series of buttons and some WS2812B LEDs. costing me between $5-$10 in parts, and so the cheapdeck name was born. This box allowed me to control my stream, with functions like start/stop broadcasting, start/stop recording, changing scenes and muting mics etc. The LEDs would keep track of what the scene was selected, mic muted etc. This was essentially a glorified keyboard. With each button press having a combination of function buttons and regular keys mapped into OBS as a shortcut. To make sure that I didn’t accidentally trigger an action and take my live stream offline, I mapped the function keys to F13-24, which are not present on any of my keyboards.

This was great! I had control of my stream in an easy macro button box, but there was a major drawback. I would have to sync the button box with OBS manually at the beginning of the stream. The LEDs triggered internally to the cheapdeck on the button presses, and there were some cases where I needed to change something in OBS for which cheapdeck had no clue about. There was no feedback from OBS to cheapdeck to say something had happened. This would cause cheapdeck to go out of sync and I would have to be creative to get it back, while trying to work on the topic of that live stream.
This is where V2 came in. I decided to change the way I interfaced with OBS in order to have the feedback loop so no matter where the action originated from, Cheapdeack would stay in sync. I decided to use an ESP32 microcontroller for this version as it had quite a few upgrades over the pro micro. Firstly it has wifi, meaning I could untether it from the PC and wear it on my forearm. Secondly, and I didn’t know at the time how critical it would be, it has 2 main processors. With this feature set, I was able to connect and eINK display to save on power consumption, and an off-the-shelf keypad. The first challenge was to get the eINK display to write some sort of data to tell me it was working. From there I iterated writing my own text and variables, connecting to the network etc, until i built up a user interface that worked with OBS.

I did have an issue with the eINK display, in that there was a small delay in writing updates to the screen. This was not a major issue, but it did make the user experience sluggish, as it would often miss button presses which made me feel i was fighting it. This was overcome by offloading screen updates to the 2nd core of the ESP32. Not that I knew it at the time, but I had just written a multi-threaded application using Real-Time OS (RTOS).
At this point, it was time to get it off the prototyping board and onto it’s own PCB. Using KiCAD, FLATCAM and CNCjs, I was able to mill my own PCBs that looked great. Well… they did until I tried to apply a solder mask. This was a 2 sided milling operation and I had some challenges with vias (connections from one side of the board to another), meaning I had to run some enameled wire to the pins of the ESP to make things work.


Now I knew i had a solid platform, I resigned the PCB in KiCAD to have a PCB per row of the keypad. This would allow me to apply a curve to the assembly and allow it to wrap around my forearm. I used a PCB manufacturing service to make a board that looks professional and a whole lot better than my homemade attempts. In addition to this I changed the battery I was using from an 18650 to a puch style lithium cell. This helped compress the overall package height. With this cell I got over 28 hours of continuous use. Plenty to cover a live stream.


I knocked up a case in CAD and 3d printed it and attached it to an elasticated bracer for last year's Makers Central

I have successfully used cheapdeck to control my livestream at home, beaming in HVEC video and control telemetry from a remote location over the last 2 years.
This is quite the setup, and not the most user-friendly experience.
So this is where we are today. V3 is in development and if things go to plan, I will be launching a kickstarter this year. V3 will have a complete software rewrite so that it's more user-friendly and have more uses than for live streaming. It will be rebranded to a more appropriate name for marketing purposes and will be a product that can be bought.
That’s a lot to type, and a lot for you to read and digest.
If you made it this far, thank you.
I have summarised a lot here as I’m condensing the process of 4 or 5 years of work into a single post. So if you want more details, feel free to ask
