NateLiquidGravity
Alibre Super User
I would do both ends like normal.
Then draw the top guide curve tangent at 7.5° extending just into the other end.
Then while still in the sketch do Sketch > Insert > 3D Point on the start and end of the guide curves.
Then create planes offset from a standard plane through that 3D points.
Then you can draw the ovals and loft.
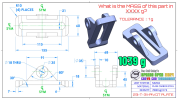
With the problems they had with getting the right mass it's hard to say which loft settings will be necessary without trying and comparing.
Then draw the top guide curve tangent at 7.5° extending just into the other end.
Then while still in the sketch do Sketch > Insert > 3D Point on the start and end of the guide curves.
Then create planes offset from a standard plane through that 3D points.
Then you can draw the ovals and loft.
With the problems they had with getting the right mass it's hard to say which loft settings will be necessary without trying and comparing.
")