Table of Contents
TopicsWhat is 3D Printing?
3D printing is a manufacturing process that results in the creation of objects that can be used for many purposes. Imagine taking a hot glue gun and depositing some glue onto a table. Then depositing more glue on top of the previous glue. Eventually you will build up enough layers that a wall forms.
3D printers - specifically FDM (Fused Deposition Modeling) printers - do the same thing, but a lot more precise, and instead of using glue they use plastics. Other types of 3D printing can involve lasers, powders, or liquids, but we are focusing here on the more consumer-friendly FDM printers.
3D printers - specifically FDM (Fused Deposition Modeling) printers - do the same thing, but a lot more precise, and instead of using glue they use plastics. Other types of 3D printing can involve lasers, powders, or liquids, but we are focusing here on the more consumer-friendly FDM printers.
Things you will need
When breaking into the world of 3D printing, there are a few suggested items you will need to make your journey easier.
An FDM (plastic extrusion) 3D printer
FDM stands for ‘Fused Deposition Modeling’ and is the kind of printer that uses filament that is drawn into an extruder, melted, and pressed out of a nozzle to form the part you want to print. FDM printers are mature, and depending on your needs you can get one for as little as $99, or into the tens of thousands depending on your requirements.
A part to print, and a modeler to create the model
Printable part files commonly come in the STL format, standing for stereolithography format. Step files are also common - they can be easily opened in a CAD program and converted to STL for printing. 3D CAD, or computer aided-design cad software, is excellent for creating your own feature-based 3D parts instead of looking all over the internet to print someone else's parts.
2D CAD alone will not work well for 3D printing. They are made to create 2D elements, like blueprints, whereas 3D printing is meant for making things in 3D. It is important to understand the different types of CAD and if the one you have will allow you to create the outputs the 3D printing process requires.
2D CAD alone will not work well for 3D printing. They are made to create 2D elements, like blueprints, whereas 3D printing is meant for making things in 3D. It is important to understand the different types of CAD and if the one you have will allow you to create the outputs the 3D printing process requires.
A slicer program
A slicer is something that can convert 3D models, something that humans understand, into g-code, a language that 3D printers understand. Some slicers are proprietary, while others are open source programs. All slicers primarily read STL file formats for creating 3D parts. There are some cloud based monitoring solutions that accompany slicers, but we will stick to the basics here.
Almost all 3D printers will come with a slicer designed for the 3D printer, and many 3rd party slicers are designed for many different printers.
Almost all 3D printers will come with a slicer designed for the 3D printer, and many 3rd party slicers are designed for many different printers.
Part Design & Orientation
Let's start by discussing the limitations of 3D printers! While 3D printing offers more design freedom than just about any other manufacturing process, we aren’t completely off the hook in the need to design for manufacture. Certain features will compromise the quality of the print. Here are a few things to keep in mind when working in product design:
Can I eliminate long overhangs on the part?
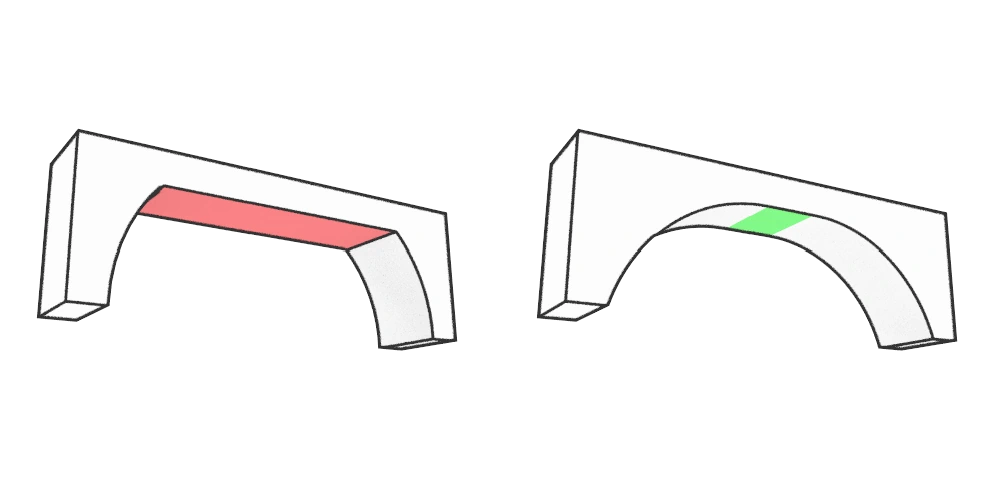
Imagine printing this bridge out as shown. Since 3D printers work layer by layer, the printer must build the two towers that make the bridge first, and then run material between the two towers with nothing to support the material in-between. This is known as an overhang or bridge, and is to be avoided if possible, for the best quality print.
Overhangs depend on the machine, print settings, material, cooling and other factors. A general rule is 45° overhangs will always be printable and 60° will always be printable for finer settings. Overhangs will also not be an issue if they don’t go very far away from supported material. When determining what of these solutions are 3D printable, all of these features can be addressed in your CAD solution.
Sometimes you can't avoid overhangs and often your printer will surprise you - just test what you can get away with.
In this specific example we fixed the problem by making the sides bigger, but there is a better way. We can fix this overhang problem by printing the part upside down by leveraging part orientation. It is well worth thinking ahead and designing the part with bridging and overhangs in mind, which we will talk about next.
What face should I put on the print bed?
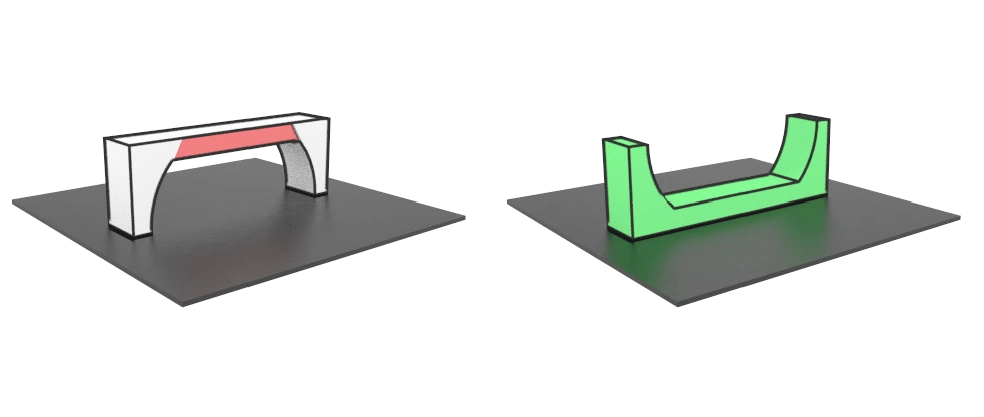
Have a look at the above example. Deciding which face to put on the print bed and designing the part around that orientation makes for a higher quality print and prevents failed prints. By strategically choosing which side is up, you can often avoid overhangs entirely.
I want two parts to fit together. How should I dimension those?
The simplest way to say it is that a peg that is exactly 3” will not fit into a hole that is exactly 3”. There must always be a dimensional difference for parts to fit into each other. 3D printers are also susceptible to “overbuild” which means a little extra material may be added outside your intended dimensions, usually resulting in larger pegs and smaller holes than designed for.
There isn’t a simple solution to this, as these factors are heavily dependent on what kind of printer is being used and the type of material. But getting good fits isn’t daunting either - a reasonable starting point is to plan for one part to be 0.01” to 0.02” smaller than the part it will be fitting into and running some simple test prints prior to a final print can save materials and time in optimizing the best fit.
In short, there are some guidelines for starting out, but you need to test your printer's capabilities.
Slicer Settings
Great 3D prints start with great settings! Once the part is designed, slicer settings are the single greatest effect on how long it takes to print the part, the quality of the print, and strength of the part. Let's dive into the critical settings here:
Layer Height
Layer height of the print has significant implication on the print time of the part as well as the quality of what is printed. Using a smaller value for layer height significantly increases the strength of the part, according to Kuznetsov, V. et al in the research paper “Strength of PLA Components Fabricated with Fused Deposition Technology Using a Desktop 3D Printer as a Function of Geometrical Parameters of the Process”.
The research concludes: “The layer height had the greatest influence on intra-layer cohesion. Part strength decreased along with layer height increase for all nozzles investigated (0.4, 0.6, and 0.8 mm) over the whole range of layer height values tested. For the samples under study, the decrease of strength when changing layer height from minimum to maximum was about 3.5 times.” This, of course, comes at a cost. Expect a far longer print time when pursuing small layer heights.
The research concludes: “The layer height had the greatest influence on intra-layer cohesion. Part strength decreased along with layer height increase for all nozzles investigated (0.4, 0.6, and 0.8 mm) over the whole range of layer height values tested. For the samples under study, the decrease of strength when changing layer height from minimum to maximum was about 3.5 times.” This, of course, comes at a cost. Expect a far longer print time when pursuing small layer heights.
Infill
Slicers will default to printing the part hollow and will use an internal support material known as infill, to maintain strength of the part. Using infill instead of printing the part as a solid piece significantly reduces both the time needed to print and the amount of material used. Infill has variable density. A user can specify if they want the interior of the part to be 90% empty space, 50% empty space, 10% empty space, or any custom value.
Along with variable density, the slicing software also allows for different patterns. Hexagon patterns, gyroid, grid and many other kinds of patterns are usually available. Each have pros and cons, but for many parts that are not put under stress - like ones that will sit on a shelf - the choice of infill doesn't matter for anything except print time.
Along with variable density, the slicing software also allows for different patterns. Hexagon patterns, gyroid, grid and many other kinds of patterns are usually available. Each have pros and cons, but for many parts that are not put under stress - like ones that will sit on a shelf - the choice of infill doesn't matter for anything except print time.
Support Material
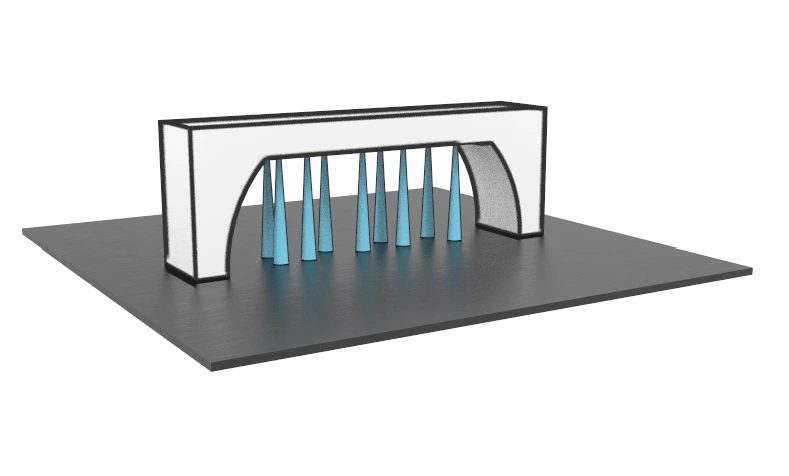
Remember that bridge we were looking at when we were discussing overhangs and bridging? There is another way to maintain quality when dealing with overhangs that comes with its own set of pros and cons. This is known as using supports or using support material.
Support material is something the slicer adds to the print and can be customized by the slicer. For example, you can tell the slicer to automatically add support material on overhangs that exceed 60°, or whatever angle you specify.
The difficulties of using support material come with removal- support material can bind with the printed part making the resulting surface finish reduced in quality. It is also possible that tools used to remove the support material may also contact the part and compromise the quality.
If you have a dual-head printer, you can use one head to print the plastic and another head to print the support material - meaning that you can choose which material the support material is made of. This gives greater flexibility as some support materials are dissolvable. Otherwise, you'll print the supports using the same material as the part, and will need to chip it off when complete.
Printer settings
Printer filament is rather forgiving and can be printed at several temperatures and still work. However, fine tuning can make a difference. One way to do so is with temperature towers. A temperature tower requires custom g-code for printers and is more of a ‘use at your own risk’ deal.
Temperature towers come in layers and have various repeating features like overhangs. The g-code is set to print every feature at a different temperature to see how the quality of a print changes as the temperature changes. You can inspect the finished part and visually look for areas of high and low quality to get a sense of the right temperature you should use for that material.
Temperature towers come in layers and have various repeating features like overhangs. The g-code is set to print every feature at a different temperature to see how the quality of a print changes as the temperature changes. You can inspect the finished part and visually look for areas of high and low quality to get a sense of the right temperature you should use for that material.
Bed Adhesion
The initial print layers directly on the bed are critical - if they pop off during the print, the part will move around and the print will be lost. Thermoplastics also change shape as they heat and cool, and if you have poor bed adhesion the initial layers may warp as they cool and lift slightly off the bed, likely ruining your part as well.
Bed adhesion not only ensures there is enough area to keep the part standing throughout the print, but also helps to mitigate warp the part could have.
Bed adhesion not only ensures there is enough area to keep the part standing throughout the print, but also helps to mitigate warp the part could have.
Brim and Raft
Slicers are capable of adding rafts and brims. A raft lays down sacrificial layers of material for the part to be printed on. It makes for excellent adhesion and prevents traditional signs of warp but may be difficult to remove from the part and it uses more material. A brim extends around the first layer of the part and creates extra surface area for bed adhesion. Brims can be effective against warping, and they can act as a middle ground between using a raft and not using extra material to prevent warp. Both must be removed from the part after printing during post-processing.
Glue sticks and hairspray
Depending on print bed material and the type of filament being printed with, the print may stick too much to the print bed or not enough. Glue Sticks work well as it can prevent warping and even ensure that worn or imperfect beds still have the adhesion they need. Glue sticks are also water soluble and easy to wash for that reason.
The active chemical in hairspray that causes bonding and makes it work is vinyl acetate or crotonic acid copolymer, most commonly known as PVA. Not all hairsprays have this desired ingredient, so be sure to buy maximum strength hairspray. Being an aerosol, they are easy to spray onto a bed, and don’t require constant cleaning of the print bed. Hairspray works with high temperatures and are hydrophobic, so they add benefits of keeping moisture away. Be aware that hairspray is flammable.
The active chemical in hairspray that causes bonding and makes it work is vinyl acetate or crotonic acid copolymer, most commonly known as PVA. Not all hairsprays have this desired ingredient, so be sure to buy maximum strength hairspray. Being an aerosol, they are easy to spray onto a bed, and don’t require constant cleaning of the print bed. Hairspray works with high temperatures and are hydrophobic, so they add benefits of keeping moisture away. Be aware that hairspray is flammable.
Slurry and Juice
Occasionally, when printing with soluble materials such as ABS or PVB, extra filament is dissolved into the chemical they are soluble in. This creates a 'slurry' or 'juice' that can be poured onto the print bed. Once the print is started, the filament is printed on to the slurry or juice instead of being printed directly on to the print bed. This increases material adhesion to the bed.
Shell thickness
You may find, when working with 3D print slicers, that the slicer defaults to creating a hollow part. This offers several distinct advantages- a faster print, large material savings, and infill that adds a great amount of strength.
Just as a house relies on a foundation for stability, shell thickness is the stability of the 3d print. This determines how much thickness the outside the part has before it becomes hollow and filled with infill. Thicker shell thicknesses are of course stronger, but the strength comes at the cost of more material and longer printing time.
Just as a house relies on a foundation for stability, shell thickness is the stability of the 3d print. This determines how much thickness the outside the part has before it becomes hollow and filled with infill. Thicker shell thicknesses are of course stronger, but the strength comes at the cost of more material and longer printing time.
Material Selection
PLA
PLA, standing for polylactic acid, is arguably the most common material to 3D print with. It is cost effective, more environmentally friendly than a lot of polymer materials, and comes in many varieties. It does not require a heated bed. It is made with corn starch instead of petroleum.
ABS
ABS, standing for Acrylonitrile Butadiene Styrene is another commonly used material for 3D printing, and is a common plastic in general. It can be post processed with acetone to be smoothed and shined. ABS has a better ductility (flexibility) as compared to PLA, although also severely warps. Careful consideration should be given to bed adhesion, orientation and other factors to prevent warp.
PETG
PETG, standing for Polyethylene Terephthalate Glycol Modified, provides an excellent balance between the benefits of both ABS and PLA. It has great layer adhesion, warp resistance, reduced shrink, good chemical resistance properties, is odorless and easier to work with than ABS.
Nylon
Nylon is often reinforced with particles of carbon fiber, making it a strong material that has a range of applications. It has high thermal resistance and low shrinkage, especially because of any carbon fiber additives.
PVB
Do you like the idea of vapor smoothing, but don’t want to burn down the house with acetone? PVB is the solution. PVB offers a PLA-like ease of 3D printing and is soluble in Isopropyl (Rubbing alcohol) so you can smooth without the harsher chemicals. Similar to PLA, it is low shrink, easy to print, and is odorless.
Polypropylene
This lesser used material is fantastic for everyday products. It can flex where other materials break and can even support printing living hinges. This material has a grippiness to it that will feel great in hand. Polypropylene is very chemically resistant. Because polypropylene is the second most used plastic, shortly behind polyethylene, it is also recyclable.
TPU
TPU, standing for Thermoplastic Polyurethane, are soft and flexible filaments. This filament may fell more like rubber or silicone than an actual plastic. It has naturally great bed adhesion, is low warp and odorless.
PC
PC, standing for polycarbonate, is a difficult material to print with. It has high temperature requirements, so high in fact most printers won’t be able to print it. It requires an very hot print bed and an enclosure for the ambient air to stay hot enough to make printing possible. Polycarbonate has good impact heat and chemical resistance, is normally transparent, and can be bent without breaking. The material is sensitive to moisture and special measures must be used to keep it dry.
Post Processing
3D printed parts can often be enhanced after the print. They can be be painted, vapor smoothed, and more.
Sanding
Sometimes it takes a little extra effort to get the perfect fit between two parts. If there is slightly too much material, getting some fine grit sandpaper may be just enough to smooth and remove material to get the perfect fit.
Vapor Smoothing
Some materials can be dissolved by chemicals. The most discussed case of this ABS and Acetone. Acetone is a dangerous chemical and should be handled with proper training. If ABS is exposed to Acetone vapor, it will melt the outside the print thereby smoothing it and hiding layer lines. A better case than ABS for vapor smoothing though is materials based on Polyvinyl Butyral (PVB). This material is soluble in Isopropyl (rubbing alcohol) meaning it can be smoothed with less hazard. These materials print as easily as PLA, are odorless and offer low shrink and warp.
Conclusion
3D printing has many facets and features that make it great. Much thought has been given to save material, time and money when 3D printing. Few processes offer the level of design freedom that 3D printing does. Enjoy the ability to turn your dreams into a reality!